 This is a photo from a fire started just outside my appartment. The fire was dangerously close to my car but luckily the skilled firemen got the fire under control very quickly. The reason for the riot is apparently because of the re-publication of the famous Muhammad drawings in the Danish newspapers. I really think that "Respect" should be a mandatory course taught in primary school. To me it seems like respect for one another has simply disappear from this world. Everyday I see the lack of respect between people, whether it's between men and women, christians and muslims, employers and employees, buyers and sellers, children and adults. Oh dear oh dear, what has this place come to. Please, if you read this, respect the people and things around you!
Friday, 15 February 2008
Riots in Gellerup
Tuesday, 12 February 2008
Creating a custom JSF message component
The other day I was tasked with creating feedback messages for a JSF-based application as JavaScript alert dialogues. JSF already got a tag for displaying messages attached to components (<h:message /> and <h:messages />), however they are limited to render the text using a given cascading style sheet class for each level of severity.
This entry will show how to build a custom JSF message tag for rendering the messages as a JavaScript alert.
There are many excellent tutorials and blog entries out there describing JSF component development much better than I am capable of. So, I'll just focus on what is needed to create this specific component. My instructions are based on NetBeans 6.0, but they don't including anything that is not possible to do in other IDEs, so you should be able to translate the instructions into your own IDE.
We will keep the tag simple with one attribute, for, which will specify for which component the messages should be displayed. The signature of the tag will therefore be: <jc:alertMessage for="myForm" />.
1. Fire up NetBeans
2. Create a new Java Class Library Project (I've called mine jsf-components)
Before we continue let me briefly explain what we need:
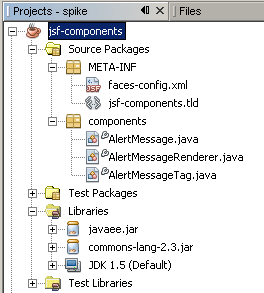
META-INF/jsf-components.tld- Tag library descriptor declaring your tag and defining its attributes
META-INF/faces-config.xml- Declares the tag in the faces application
components/AlertMessage.java- Class representing the user interface component with properties for each attribute supported by the tag. It's recommended to sub-class one of the existing components to avoid doing all the work yourself.
components/AlertMessageRenderer.java- Class for rendering the content of the tag. This is the class where we will actual construct the HTML/Javascript code that is outputted to the browser.
components/AlertMessageTag.java- Class representing the actual tag.

Now that we know what to do - lets get on with it.
3. Create the
components package in the Source Packages
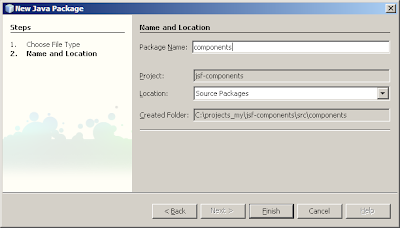
3a) Right click Source Packages
3b) Select 'New'
3c) Select 'Other'
3d) Select 'Java'
3e) Select 'Java Package'
3f) Click 'Next'
3g) Enter
components as the package name3h) Click 'Finish'
4. Create the tag library descriptor
4a) Right click Source Packages
4b) Select 'New'
4c) Select 'Other'
4d) Select 'Web'
4e) Select 'Tag Library Descriptor'
4f) Click 'Next'
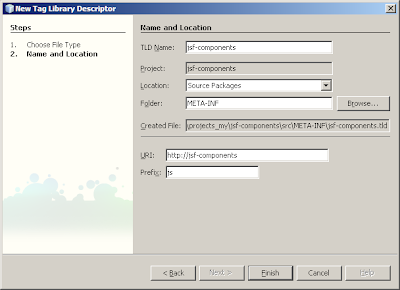
4g) Enter the following information:

- TLD name:
jsf-components - URI:
http://jsf-components - Prefix:
jc
4h) Click 'Finish'
5. Add the javaee.jar from the GlassFish project (
%GLASSFISH%/lib) to the library dependencies of the project.6. Create the Java class for the UI component, AlertMessage subclassing the
UIMessage component.
package components;

import javax.faces.component.UIMessage;

public class AlertMessage extends UIMessage {

    private static final String MSG_COMPONENT_TYPE = "components.alertmessage";
    private static final String MSG_COMPONENT_FAMILY = "javax.faces.Message";

    @Override
    public String getFamily() {
        return MSG_COMPONENT_FAMILY;
    }

    @Override
    public String getRendererType() {
        return MSG_COMPONENT_TYPE;
    }

    @Override
    public String getFor() {
        return super.getFor();
    }

    @Override
    public void setFor(String forParam) {
        super.setFor(forParam);
    }
}
7. Create the Java class for the tag, AlertMessageTag subclassing the
UIComponentELTag tag.
package components;

import javax.el.ValueExpression;
import javax.faces.component.UIComponent;
import javax.faces.webapp.UIComponentELTag;
import javax.servlet.jsp.JspException;
import javax.servlet.jsp.PageContext;
import javax.servlet.jsp.tagext.Tag;

public class AlertMessageTag extends UIComponentELTag {

    private ValueExpression forParam;

    private static final String MSG_COMPONENT_TYPE = "components.alertmessage";

    private static final String MSG_RENDERER_TYPE = "components.alertmessage";

    @Override
    public String getComponentType() {
        return MSG_COMPONENT_TYPE;
    }

    @Override
    public String getRendererType() {
        return MSG_RENDERER_TYPE;
    }

    @Override
    protected void setProperties(UIComponent component) {
        super.setProperties(component);
        AlertMessage em = (AlertMessage) component;
        em.setValueExpression("for", forParam);
    }

    @Override
    public int doEndTag() throws JspException {
        return super.doEndTag();
    }

    @Override
    public int doStartTag() throws JspException {
        return super.doStartTag();
    }

    @Override
    public void setPageContext(PageContext ctx) {
        super.setPageContext(ctx);
    }

    @Override
    public void setParent(Tag tag) {
        super.setParent(tag);
    }

    public void setFor(ValueExpression forParam) {
        this.forParam = forParam;
    }
}
9. Create the Java class for rendering the tag, AlertMessageRenderer subclassing the JSF
Renderer.
package components;

import java.io.IOException;
import java.util.Iterator;
import javax.faces.application.FacesMessage;
import javax.faces.component.UIComponent;
import javax.faces.context.FacesContext;
import javax.faces.context.ResponseWriter;
import javax.faces.render.Renderer;
import org.apache.commons.lang.StringEscapeUtils;

public class AlertMessageRenderer extends Renderer {

    @Override
    public void encodeBegin(FacesContext context, UIComponent component) throws IOException {
        AlertMessage alertMessage = (AlertMessage) component;

        // Locate the component for which to display messages
        UIComponent forComponent = alertMessage.findComponent(alertMessage.getFor());

        // If the component could not be found end processing
        if (forComponent == null) {
            return;
        }

        // Iterate through messages for the component
        Iterator iter = context.getMessages(forComponent.getClientId(context));
        if (iter.hasNext()) {
            ResponseWriter writer = context.getResponseWriter();

            // Start the script tag
            writer.startElement("script", alertMessage);
            writer.writeAttribute("type", "text/javascript", null);

            // Construct one big string of all messages
            StringBuffer message = new StringBuffer();
            while (iter.hasNext()) {
                FacesMessage msg = (FacesMessage) iter.next();
                if (message.length() > 0) {
                    // Separate each message with the JavaScript escape code
                    // for newline
                    message.append("\n");
                }

                message.append(msg.getSummary());
            }

            // Escape the constructed string to be outputable as a JavaScript
            String displayMessage = StringEscapeUtils.escapeJavaScript(message.toString());

            // Output the javascript code for displaying the alert dialogue
            String jsAlert = "alert('" + displayMessage + "');";
            writer.writeText(jsAlert.toCharArray(), 0, jsAlert.length());

            // End the script tag
            writer.endElement("script");
        }
    }

    @Override
    public void decode(FacesContext ctx, UIComponent component) {
        if (ctx == null || component == null) {
            throw new NullPointerException();
        }
    }
}
Notice that I'm using
StringEscapeUtils.escapeJavaScript(String) from the Apache Commons Lang library to ensure the correct output of the JavaScript code.10. Update the tag library descriptor to reflect the created component:
<?xml version="1.0" encoding="UTF-8"?>
<taglib version="2.0" xmlns="http://java.sun.com/xml/ns/j2ee" xmlns:xsi="http://www.w3.org/2001/XMLSchema-instance" xsi:schemaLocation="http://java.sun.com/xml/ns/j2ee web-jsptaglibrary_2_0.xsd">
    <tlib-version>1.0</tlib-version>
    <short-name>jc</short-name>
    <uri>http://jsf-components</uri>
    <tag>
        <name>AlertMessage</name>
        <tag-class>components.AlertMessageTag</tag-class>
        <body-content>JSP</body-content>
        <attribute>
            <description>
                The ID of the component whose attached FacesMessage object
                (if present) should be diplayed by this component.
            </description>
            <name>for</name>
            <required>true</required>
            <deferred-value/>
        </attribute>
    </tag>
</taglib>
11. Create the faces configuration (
META-INF/faces-config.xml) for the component:
<?xml version='1.0' encoding='UTF-8'?>
<faces-config version="1.2" xmlns="http://java.sun.com/xml/ns/javaee" xmlns:xsi="http://www.w3.org/2001/XMLSchema-instance" xsi:schemaLocation="http://java.sun.com/xml/ns/javaee http://java.sun.com/xml/ns/javaee/web-facesconfig_1_2.xsd">
    <component>
        <component-type>components.alertmessage</component-type>
        <component-class>components.AlertMessage</component-class>
    </component>

    <render-kit>
        <renderer>
            <description>Renderer for the alert message component.</description>
            <component-family>javax.faces.Message</component-family>
            <renderer-type>components.alertmessage</renderer-type>
            <renderer-class>components.AlertMessageRenderer</renderer-class>
        </renderer>
    </render-kit>
</faces-config>
12. Build the class library
All you need to do now is to place the jsf-components.jar into your web application, declare the tag library (
<%@taglib prefix="jc" uri="http://jsf-components" %>) on the pages where you want to use the tag (<jc:alertMessage for="componentId" />). Example:
<%@page contentType="text/html"%>
<%@page pageEncoding="UTF-8"%>
<%@taglib prefix="f" uri="http://java.sun.com/jsf/core"%>
<%@taglib prefix="h" uri="http://java.sun.com/jsf/html"%>
<%@taglib prefix="jc" uri="http://jsf-components" %>
<!DOCTYPE HTML PUBLIC "-//W3C//DTD HTML 4.01 Transitional//EN" "http://www.w3.org/TR/html4/loose.dtd">
<html>
    <head>
        <meta http-equiv="Content-Type" content="text/html; charset=UTF-8">
        <title>Example of AlertMessage component</title>
    </head>
    <body>
        <f:view>
            <h:form>
                <jc:AlertMessage for="numberField" />
                <h:inputText id="numberField">
                    <f:validateLength minimum="5" maximum="10" />
                    <f:validateLongRange minimum="10000" maximum="222222" />
                </h:inputText>
                <h:commandButton value="Submit" action="reload" />
            </h:form>
        </f:view>
    </body>
</html>

UPDATE (30. July 2008): Facelets Support
You can use the component with Facelets by providing a Facelets Tag Library descriptor. In this example I name the tag library descriptor
mycomponents.taglib.xml and place in the WEB-INF/ directory.The contents of the descriptor is:
<?xml version="1.0"?>
<!DOCTYPE facelet-taglib PUBLIC "-//Sun Microsystems, Inc.//DTD Facelet Taglib 1.0//EN" "http://java.sun.com/dtd/facelet-taglib_1_0.dtd">

<facelet-taglib>
    <namespace>http://jsf-components</namespace>
    <tag>
        <tag-name>alertMessage</tag-name>
        <component>
            <component-type>components.alertmessage</component-type>
            <renderer-type>components.alertmessage</renderer-type>
        </component<
    </tag<
</facelet-taglib<
Next you need to reference the descriptor in
web.xml using the facelets.LIBRARIES context parameter:
<context-param>
    <param-name>facelets.LIBRARIES</param-name>
    <param-value>/WEB-INF/mycomponents.taglib.xml</param-value>
</context-param>
Remember that if you have more than one Facelets Tag Library Descriptor, to separate them using semicolons (;)
Wednesday, 6 February 2008
Getting to know Solaris
The past ten years I've been working comfortably with various distributions of Linux (Ubuntu, Kubuntu, Gentoo, Mandrake, RedHat, Debian, Suse) and I have really enjoyed what they have to offer. During the four years where I was self-employed all my machines were running one or the other distribution of Linux (My favourite to this day is Ubuntu closely followed by Gentoo).
Anyways, lately I've become curious about Solaris and would like to use it for a Java build server that I'm setting up. The server will host a versioning system (Subversion), a continuous integration system (CruiseControl most likely) and an issue tracking system (Mantis most likely).
Last weekend I started my project to set-up Solaris. It's been quite a struggle as I thought that I could just transfer all my Linux skills to Solaris - but little did I know at that time.
Status as of now is that I've
- downloaded the DVD image of Solaris 10 onto my Windows workstation
- Merged the two ISO files (this took me time to figure out as I'm not exactly known for reading the instructions before starting work!)
- Created a Virtual Machine in the free version of VMWare 1.0.4 with 15 GB Hard disk space
- Installed Solaris with the minimum required software (the first few times I installed it I didn't select the custom installation and ended up installing both Java Desktop System and CDE - all I really wanted was just a text console).
- Installed pkg-get for package management
- Installed a few packages like SSH, Subversion, Apache, PHP, MySQL
One thing that has thoroughly annoyed me is package management. When you're use to apt-get (Debian) its hard getting use to tinker around so much to get packages to compile and configure properly.
So here I am... I've been contemplating how to continue from here, and that is when I saw an announcement about free Solaris training in Sun Learning Centre with the added bonus of being part of a $50,000 sweepstake!
For any other people considering Solaris I'd recommend signing up for the free training while it lasts as it will give you a head start on the nitty gritty of Solaris.
More about my adventures into Solaris later.
Custom code folding in NetBeans
When you got large source files it can sometimes be helpful to create foldings for certain sections of your code. NetBeans got a nifty functionality for this using non-intrusive XML code (similar to Visual Studio).
To create a custom code folding section simply insert the following before the content to fold:
//<editor-fold defaultstate="collapsed" desc="My custom code folding">
and the following after the content to fold:
.
//</editor-fold>
So for example, if you had a JSF backing bean where you want to create a custom code folding for your properties, action listeners, and action handlers you could do as follows:
package backingbeans;

import javax.faces.model.*;
import javax.faces.event.*;

public class MyBackingBean {

    private String prop1 = "";

    public MyBackingBean() {
    }

    //<editor-fold defaultstate="collapsed" desc="Properties">
    public String getProp1() {
        return this.prop1;
    }

    public void setProp1(String prop1) {
        this.prop1 = prop1;
    }
    //</editor-fold>


    //<editor-fold defaultstate="collapsed" desc="Action listeners">
    public void myFirstListener(ActionEvent event) {
        ... do something ...
    }

    public void mySecondListener(ActionEvent event) {
        ... do something else ...
    }
    //</editor-fold>

    //<editor-fold defaultstate="collapsed" desc="Action handlers">
    public String myFirstActionHandler() {
        ... do something ...
        return "OUTCOME1";
    }

    public String mySecondActionHandler() {
        ... do something else ...
        return "OUTCOME2";
    }
    //</editor-fold>
}
This will create three custom folders that are collapsed by default when the file is opened.
If you like this, I'd suggest setting up a coding template for inserting the XML code as it can otherwise be tricky to remember. This is done by following these steps:
- Click Tools -> Options
- Select "Editor" from the top options
- Select the "Code Templates" tab
- Select "Java" in the Language dropdown
- Click the "New" button
- Enter the shorthand for inserting the template, for example I use 'efold'
- Click the "OK" button
- The template has been created, now enter the following code into the Expanded Text textbox:
    //<editor-fold defaultstate="collapsed" desc="${cursor}">

//</editor-fold> - Click the "OK" button.
You can try out the template by opening a Java source file, place the cursor where you want to insert the folding and type
efold followed by the tab key. It will now have inserted the complete editor-fold and place the cursor ready for you to enter a description for the folding.
Monday, 4 February 2008
Using the "License" functionality in NetBeans 6
NetBeans 6 comes with a brand new functionality for including project-based licenses in source files. This enables you to easily use different licenses in the headers depending on the project you are working on.
Using the functionality is simple, here are the steps:
- Add your licenses to the NetBeans templates
- Update the
project.propertiesto specify the desired license
Okay, first we add a license to the NetBeans template. For the sake of this example I'll add the GPL license:
- Click Tools -> Templates
- Expand the "Licenses" folder
- Select "Default License"
- Click the "Duplicate" button (a new template is created called license-default_1.txt)
- Select license-default_1.txt
- Click the "Rename" button
- Name the new license license-gpl.txt (notice, the name should follow the format: license-
.txt) - Select license-gpl.txt
- Click "Open in Editor"
- Enter the following text (GPL license) into the editor:
<#if licenseFirst??>
${licenseFirst}
</#if>
${licensePrefix}${name}.java
${licensePrefix}
${licensePrefix}Copyright (C) ${date?date?string("yyyy")} Allan Lykke Christensen
${licensePrefix}
${licensePrefix}This program is distributed in the hope that it will be useful,
${licensePrefix}but WITHOUT ANY WARRANTY; without even the implied warranty of
${licensePrefix}MERCHANTABILITY or FITNESS FOR A PARTICULAR PURPOSE.  See the
${licensePrefix}GNU General Public License for more details.
${licensePrefix}
${licensePrefix}You should have received a copy of the GNU General Public License
${licensePrefix}along with this program.  If not, see <http://www.gnu.org/licenses/>.
<#if licenseLast??>
${licenseLast}
</#if> - Replace the author name
- Save and close the template (CTRL+S followed by CTRL+W)
You have successfully added the template to NetBeans for use in future projects.
To use the license in a project do the following:
- Open the "Files" view (CTRL+2)
- Expand the
nbprojectfolder of your project - Open the
project.propertiesfile - Add
project.license=gplin the end of the file, or if you already have a line startingproject.licensereplace it. - Save and close the file
Alright, you are ready to try out the license. Create a new Java class in your Source Packages and viola, the source file is using the newly created license.
In a future version of NetBeans I expect that it will be possible to select the license from the project properties page rather than you having to tinker around with
project.properties.
Considering Java certification
As one of my new year resolutions I promised myself that I'd get some sort of technical certification this year. Basically what I'm interested in is the Java Programmer Certification, Web Component Developer Certification and Enterprise Architect Certification. For the three certifications I've found the following prep literature:
- SCJP Sun Certified Programmer for Java 5 Study Guide (Exam 310-055): Study Guide Exam 310-055 (Certification Press) - Link
- Sun Certified Web Component Developer Study Guide (Exam 310-081) - Link
- Sun Certified Enterprise Architect for Java EE Study Guide (Exam 310-051): Study Guide Exam 310-051 (Certification Press) - Link
On the project management side I'm considering the Scrum Master Certification or Prince 2 Certification.
Any recommendation?
Concatenating strings in JSF
To start the day off I though I'd share a quick tip using JSF. Say you have a list of messages:
quicktip.Messages:
ITEM_1=First item
ITEM_2=Second item
ITEM_3=Third item
Now, on your JSF page you would like to show one of these messages depending on the ID of the item to display. For example, you might have an list of beans containing items you'd like to display:
quicktip.Item
package quicktip;

public class Item {

     /** Unique ID of the item. */
     private int id;

     /** Number of items. */
     private int count;

    public Item() {}

    ...usual getters and setters...

}
So, in your backing bean to the JSF page you have a method that constructs a DataModel containing items (I won't go into those details as it's not very exciting). For the sake of this example the signature of the method is
public DataModel getItems();Finally we get to the interesting bit, the actual JSF page.
... usual jsf stuff ...
<html>
<f:loadbundle basename="quicktip.Messages" var="msgs" />
<body>
    <h:datatable value="#{backingBean.items}" var="item">
        <h:column>
            <c:set var="key" value="ITEM_#{item.id}" />
            <h:outputtext value="#{msgs[key]}" />
        </h:column>
        <h:column>
            <h:outputtext value="#{item.count}" />
        </h:column>
    </h:dataTable>
</body>
</html>
That's it. So, the real gist of the tip is that you can use the jstl
He's back!
Hello people!
I'm back after a long hiatus! This time I intend to keep up the blogging and keep it at the same domain.
Watch this space!
